Tuesday, 7 April 2015

2 Best methods to Hack Wi-fi using Android Phones

The use of Wifi Network is common to all android users, and it's also avaliable on all android phones. Wifi network is actually a helpful tool for wireless connection to the internet with the use of radiowave of 2.4Ghz and 5GHz SHF. Wi-fi can also be known as any wireless local area network (WLAN) product which is actually based on the Institute of Electrical and Electronics Engineering (IEEE) that is of 802.11 standard.

Today's stroll, I would brief you guys on the 2 Best methods to Hack Wi-fi using Android Phones.

                                         wifi+hacking+tools

Method 1: Hacking of WPA2 WPS Routers

Step 1: Firstly, if your android phone isn't rooted, try to root it, and also make sure that such android phone have a Broadcom bcm4329 or bcm 4330 chipest unlike the Nexus 7, Galaxy S1/S2, Nuxus 1, Htc Desire HD, etc. The presence of Cyanogen ROM on your device can be of use to make the bcmon app work through.

Step 2: Then download and install bcmon, it's essential because it helps monitor mode on your broadcom chipest that helps in the PIN Cracking.


Step 3: After installation, run the app and tap "monitor mode" option.


Step 4: Download and Install Reaver app which helps to crack the WPS Pin to retrieve the WPA2 passphrase.


Step 5: After installation of reaver app, launch it and do an on-screen comfirmation, which is, comfirmint that you're not using it for illegal purpose, then tap the APN or access poin you'd wish to crack and continue. Most times, you might need to verify monitor mode to proceed, and this would cause the bcmon to open again. 


Step 6: Verify your settings and also make sure that you've checked the Automatic Advanced settings" box.


Step 7: Finally, start cracking process by tapping start attack, at this final stage, it can take 2-10hrs for the cracking of WPS to be successful.

--------------------------------------------------------------------------------------------------------------------------


Method 2: Hacking of WEP Routers


Step 1: Firstly, if your android phone isn't rooted, try to root it, and also make sure that such android phone have a Broadcom bcm4329 or bcm 4330 chipest unlike the Nexus 7, Galaxy S1/S2, Nuxus 1, Htc Desire HD, etc. The presence of Cyanogen ROM on your device can be of use to make the bcmon app work through.


Step 2: Then download and install bcmon, it's essential because it helps monitor mode on your broadcom chipest that helps in the PIN Cracking.


Step 3: After installation, run the app and tap "monitor mode" option.


Step 4: Then tap the "Run bcmon terminal" option and type "airodump-ng" and Enter. Once the airodump loads finish, you would be directed to the prompt command in which you're to type"airodump-ng wlan0" then tap the Enter button.


Step 5: In this stage, a Mac address would appear, in which you're to jot down.


Step 6: Start scanning the channel by collecting information from the access point before attempting to crack the password, then type, "airodump-ng -cchannel#--bssidMAC address-w output ath0"and tap enter, then it would start scanning, try scanning till it reaches 20,000 - 30,000 packets.


Step 7: To finally crack the password, return to the terminal, but make sure you've reached the suitable number of packets, then type "aircrack-ng output*.cap" and tap enter at the terminal.


Step 8: Once the password is cracked successfully, you would recieve a message alerting, 'Key Found'and would display the key in hexidecimal form. So when entering the key, make sure you eliminate the dots '.' or double dots ':', i.e if it displays 12:34:56:78:90, then enter 1234567890 as the code.

Best Alternative: 

The use of osmino wifi app seems to be the best any easiest method when hacking into a wifi network. Actually, it doesn't do any hacking but it serve as help to retrieve the already hacked password by someone else. It also tracks down the location of such vulnerability and gets connected it's network.
To download osmino wifi app, click here.


NOTE: Please I won't be held responsible for any illegal activity this tips is used for, it's just for knowledge sake.

keep blogging..... ;)

How to Install CyanogenMod ROM on Non-rooted Android Phones

The installation of custom Roms on android phones is quite a difficult task and also a lenghty process. Remember that when installing a custom Rom, your device needs to be rooted before proceeding to other stages of installation, but when it comes to cyanogen Roms, your android phone don't need to be rooted and you won't be needing to unlock the bootloader of your android device.


Cyanogen ROMs is of great advantage to our android device, unlike, supporting most unsupported apps on our device, increases the life span of our device, helps to push the latest version of android operating system to our device, also helps in tweaking of some android tools, as great ability of customisation of our android device and many more important features.

                         Install+CyanogenMod+ROM+on+Android+without+Rooting

How to Install CyanogenMod ROM on Non-rooted Android Phones

Step 1: Firstly, Download Cyanogen ROM Installer for android, here, and also download Cyanogenmod ROM installer app for PC. Here is the list of tested and supported device that the cyanogenmod Installer works on.


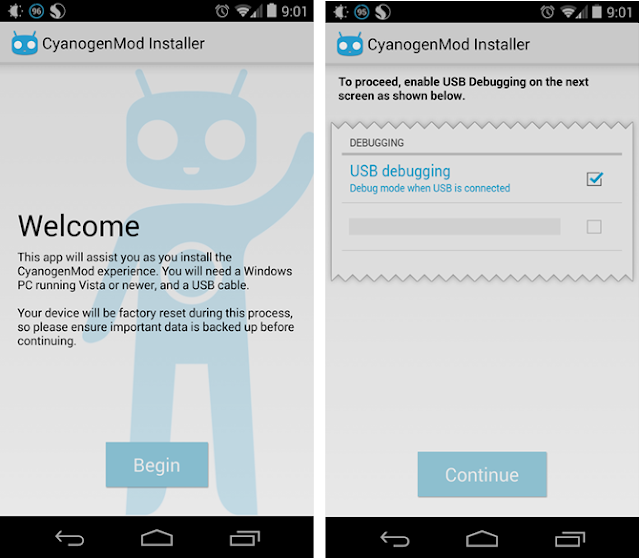
Step 2: After downloading, Enable the Usb debugging on your android device.

CyanogenMod+Installer

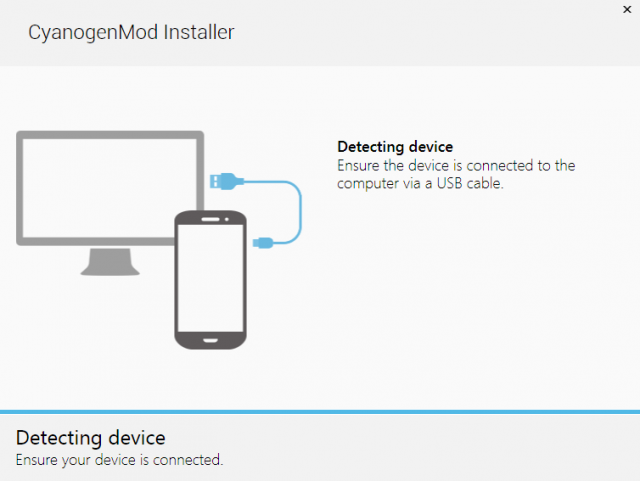
Step 3: Then run the download android app on your android phone, and follow the onscreen tuitions carefully, then connect your smartphone to your PC through the use of USB cable, then run the Cyanogenmod ROM installer app for PC on your desktop.

connect+smartphone+to+the+PC

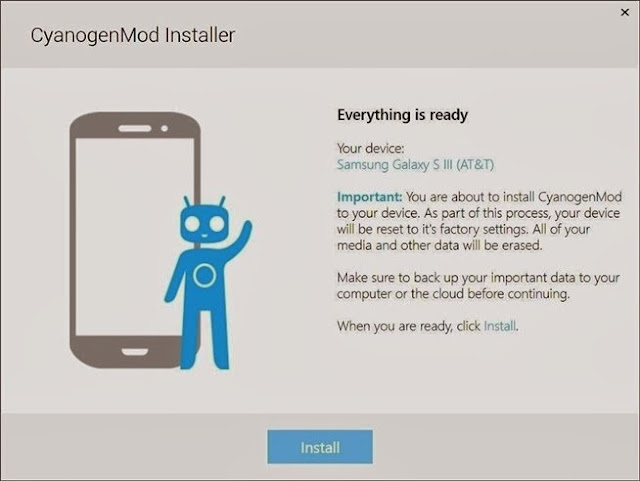
Step 4: Once the above step is proceeded, the installer would detect your device and would start to download the CyanogenMod ROM with some other recovery files on your android phone, then you would recieve a message on the installer app alerting that, 'Everything is ready', then you're good to proceed the final stage

Everything+is+ready

Step 5: At this final stage, you would notice an install button which you're to click, once you've clicked it, then a flashing process would startup and this would cause your device to turn ON and OFF.

NB: Do not disconnect your device from your PC durning this process, because it can cause a brick to your android smartphone.


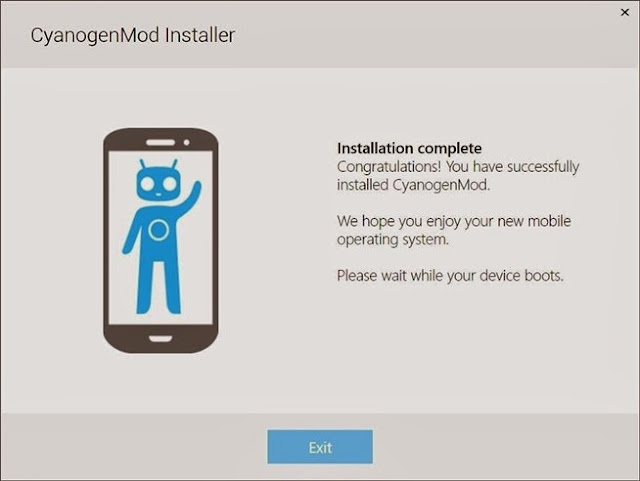
Once the flashing process is completed, you would be notified an alert on the windows installer app, which is, "Installation completed"

Installation+Complete

Congratulations, now you can freely enjoy the cyanogenmod ROM on your android phone or tablet.


Your turn...... if any problem then let me know ll help you out keep blogging...... ;)

Sunday, 5 April 2015

How to Spy on WhatsApp Messages

                                 
                        Need to Spy on a Someone’s WhatsApp Messages?
                                Relax, Here is a Complete Spying Guide!


                                           Spy on WhatsApp Messages


WhatsApp is one of the most widely used instant messaging applications during the recent years. Attractive features like cross-platform support, media sharing and ease of use has made WhatsApp to be the top choice among most smart phone users. On the other hand, WhatsApp has also become a favorite application for many cheaters to exchange secret messages and maintain illicit relationships. Therefore, in order to investigate the truth about their partners or children it becomes inevitable for many individuals and parents tospy on WhatsApp messages.

Ways to Spy on WhatsApp

This article will uncover some of the possible ways through which you can spy on WhatsApp messages of your children or suspected partner. The possible ways are as described below:

1. Spy Software: The Easiest Way

Using a spy software program is the easiest way to spy on WhatsApp messages. Although there are a handful of companies marketing substandard WhatsApp spy programs on the market today, there exists a few genuine products as well that are worth considering. One of my favorite software to spy on WhatsApp ismSpy which is known for its quality and top notch features.

Mobile Spy
 
The following are some of the exciting features of mSpy which makes it a perfect choice for monitoring WhatsApp messages:
mSpy Features:
  • Spy on call logs and SMS and Contacts
  • Secretly record emails, web history and bookmarks.
  • Spy on Internet activity including social media like FacebookWhatsAppTwitter and Gmail.
  • Track GPS locations in real-time.
  • View Device and SIM card information.
  • Record keystrokes, photos and videos.
  • Operates in a complete stealth mode and remains undetected!.
If you are a parent, mSpy can offer you an additional help as it supports a handful of control features as well:
  • Block access to unwanted apps and calls.
  • Get instant alerts when profane language is typed or viewed.
  • Remotely lock the phone or restrict its usage.
  • Remotely delete unwanted contacts, call logs, SMS and photos if desired.

How it Works?

You will have to download and install the mSpy app onto the target phone on which you need to monitor WhatsApp messages. Installation and configuration takes only a few minutes. However, for this you should have the target phone in your hand at least for a few minutes.
Once the installation is complete, the monitoring process of all the above mentioned activities (WhatsApp messages, calls, SMS, Internet, GPS, camera etc.) will begin and the recorded logs are silently uploaded to your mSpy account. You can login to your online account at any time to view the logs containing WhatsApp messages and other activity details. You can download mSpy from the link below:

Compatible Phones: Android, BlackBerry, Apple iPhone, Windows Mobile, iPod and Tablets.


2. Spoofing the MAC Address: The Difficult Way

The other way to spy on someone’s WhatsApp messages is to spoof the MAC address of the target phone from your phone. This method is somewhat considered difficult and require a moderate amount of technical skills to perform. Let me explain.
WhatsApp has a small vulnerability which allows you to run the same WhatsApp account on two phones provided they both have the same MAC address. For this, you will have to gain access to the target phone to record its MAC address and spoof the same on your device. This is how you can find the MAC address of the target phone:
For Android – Head over to settings —> About phone —> Statu s—> Wi-Fi MAC address
For iPhone – Head over to Setting s—> General —> About —> Wi-Fi address
For Windows Phone – Head over to Settings —> About —> More info —> MAC address
For BlackBerry – Head over to options —> Device —> Device and Status info —> WLAN MAC
Once you have recorded the target phone’s MAC address, you will have to spoof the MAC address on your android phone(click here). After this is done, install WhatsApp on your phone, configure it using the target person’s phone number and verify the WhatsApp account using the verification code received on the target phone.
If you successfully manage to execute all the above mentioned steps, you will have a replica of the target user’s WhatsApp account running on your phone. That means you will receive notifications on your phone for each and every activity of the target WhatsApp user. For spying on WhatsApp, I still recommend the usage of mSpy as this method is lot simpler than that of spoofing MAC address.
at your own risk keep blogging.... ;)

How to Spoof MAC Address on Android Phones

Media Access Control address (MAC address) is a 12-character unique identifier assigned to a specific piece of hardware such as the network adapter of your WiFi device. In simple words, a MAC address can be used to uniquely identify your Android phone on the Internet or the local network.

                                      Spoof MAC Address

Spoofing MAC Address on Android Devices

Even though MAC address is embedded on the hardware device during manufacture, it can still be spoofed to input a new one of your choice. Here is a detailed instruction on how to spoof MAC address on your Android phone.
Before you spoof the MAC address, you need to record the original/current MAC address of your device which can be done according to the instruction below:
  • On the Home Screen of your phone, tap Menu button and go to Settings.
  • Tap About Device and go to Status
  • Now scroll down to record the 12-digit code shown under Wi-Fi Mac address. An address would read something like:
    Example MAC address: E5:12:D8:E5:69:97

Requirements for Spoofing the MAC Address

  1. Rooted Android Phone
  2. BusyBox app installed on your phone
  3. Once BusyBox is installed, you need to install Terminal app
Once the above requirements are satisfied, follow the instructions below to spoof your MAC address:
  1. Open the Terminal app and type the commands as listed below:
    $ su [HIT ENTER]
    $ busybox iplink show eth0 [HIT ENTER]
    (This will show your current MAC address, just for your confirmation)
  2. Now, type the following command:
    $ busybox ifconfig eth0 hw ether XX:XX:XX:XX:XX:XX [HIT ENTER]
    (In the above command, replace XX:XX:XX:XX:XX:XX with your new MAC address)
  3. You have now spoofed your MAC address successfully. To check for the change enter the following command again:
    $ busybox iplink show eth0 [HIT ENTER]
    (Now you should see your new MAC address)
I hope you like this post. For feedback and queries, pass your comments
keep blogging..... ;)

Recover deleted files from Android phone

[Download] iCare Data Recovery Professional 5.1 + Serial


icare data recovery standard


 ================
[Download:]
================


================
[Software INFO:]
================

iCare Data Recovery Professional 5.1 | 3.6 MB


iCare Data Recovery Software can recover any deleted file, including documents, photos, mp3 and zip files, or even folders and damaged disks. Besides deleted file 

recovery, it is able to restore files from system error like bad boot sector, bad MBR, bad partition table, bad MFT; Virus attacked file lost like destroyed boot 

sector, MBR…; human errors like format partition by mistake, delete partition accidentally…; software errors like merging partition failure with Partition Magic, 

resizing partition failure, copy partition failure, ghost failure… In addition to HDD file recovery, the program supports any type of storage media (music sticks, 

cameras, flash drives, memory card, USB drives, etc)! It works with encrypted files and helps you recover data lost because of a virus attack or an employee's 

malicious behavior.

Key Features 
- Recover files from formatted partition, memory card, external drive, USB drive, sd card...
- Recover 2TB disk drive not formatted error and report RAW file system
- Recover MAC files on Windows
- Free lifetime upgrade once new edition released
- Recover data when lost due to resize partition, merge partition, copy partition failure by PartitionMagic, Partition Manager...
- It could restore photos, office files, zip files, rar files, emails, pdf files, etc.
- Reformatted sd card, xd card, cf card, pen stick, memory card...
- System cannot boot, cannot locate the boot partition, I/O error external drive, memory card, cf card cannot be detected or recognized...
- Virus attack and lost files
- Bad boot sector, bad partition table, damaged FAT, lost File Allocation Table...
- Recover files from FAT, NTFS partitions
- Recover files from devices with unknown file systems including Hard Disk, external ZIP/USB drive, removable SmartMedia, MemoryStick, SD cards, etc.
- Partition structures are damaged or deleted...

================
[INSTALL NOTES]
================

Step 1: Please use 7Zip/WinRAR/Universal Extractor to EXTRACT FILES.
Step 2: run the setup
Step 3: Use the given Serial to activate

How to install OxygenOS on the OnePlus One

Oxygen OS_OnePlus One

The ROM is pretty much a stock build of Android 5.0 Lollipop with some features and customization options thrown in. 
If you cannot wait for CyanogenMod 12S to come out, you can install OxygenOS on your One, but do note that the ROM comes with substantially less features and customization options than CM11S. If you don’t mind losing a few features to try out Lollipop, you can follow the steps below to install OxygenOS on the OnePlus One.
Note: Installing OxygenOS will not void the warranty of your device. However, installing the ROM requires you to unlock the bootloader of the handset, which in turn will wipe out all your personal data from the phone.
Therefore, it is recommended to make a backup of all your important data before proceeding with the steps below. In case the bootloader of your One is already unlocked, you will not have to worry about losing your music, photos and other important documents.

Unlocking the bootloader

OnePlusOne_lockscreen
Step 1: Download the ADB/Fastboot files from here (Mac), extract its content and transfer them to a folder called “one” on your desktop. Also, download TWRP recovery image from here and transfer it to the same folder.
Windows users will also have to download and install the ADB/Fastboot drivers on their system.
Step 2: Reboot your OnePlus One into fastboot mode. To do so, switch off the handset first, and then press the power button and volume up button simultaneously.
Once the fastboot logo comes up on the screen, connect the handset to your PC.
Step 3: Now, depending on whether you use Windows or OS X, open up a command prompt or Terminal window and navigate to the “one” folder on your desktop using the ‘cd’ command.
Alternatively, you can also drag ‘n’ drop the “one” folder to the terminal or command prompt window to open the directory directly.
Step 4: Make sure that the device is being detected by your PC by entering the command below.
fastboot devices
Mac owners will need to prefix a “./” before every fastboot or ADB command, so the above command will look something like this on your Mac:
./fastboot devices
Step 5: Now, unlock the bootloader on your One using the below command:
fastboot oem unlock
For Mac:
./fastboot oem unlock
Make sure to confirm the selection by pressing the Volume up button on your One. Once the bootloader is unlocked, your handset will automatically boot back into Android. You can skip the setup process for now, since you will end up installing OxygenOS anyways.

Install TWRP recovery

twrp
Step 6: Download OxygenOS from here, and transfer it to the internal storage of your handset. Then, again boot your One back into fastboot mode by following Step 2 from above.
Step 7: You now need to flash TWRP recovery on your One by executing the following command:
fastboot flash recovery <insert twrp recovery filename.img>
On a Mac:
./fastboot flash recovery <insert twrp recovery filename.img>

Installing the OxygenOS ROM

Step 8: Disconnect your One and switch it off. Then, boot the handset into recovery mode by pressing and holding down the Volume down key and the Power button simultaneously.
twrp_system
Step 9: After your OnePlus One has booted into TWRP recovery, tap on the ‘Wipe’ option. Select ‘system’ and ‘data’ partition and then confirm your selection by swiping the arrow at the bottom to the right.
Step 10: Once the partitions have been formatted, select the ‘Install’ button and navigate to the folder where you had transferred the ZIP file of OxygenOS. Confirm your selection by swiping the arrow on the bottom to the right.
Step 11: Once OxygenOS has installed, select the ‘Reboot system’ option in TWRP recovery.
Your OnePlus One is going to take sometime to boot into OxygenOS for the first time, so don’t panic if the phone seems stuck on the boot logo for a few minutes.
In case you are facing any issues while installing OxygenOS on your OnePlus One, drop in a comment and i will be happy to help you out...

keep blogging... ;)